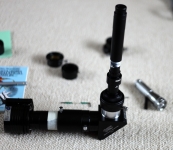
I have three M26C one shot colour CCDs on the mini-WASP array, and for some reason one of these cameras was proving difficult to flatten precisely.
My usual technique for getting the chip flat to the optical plane is to take an image of a star field and then run CCDInspector to tell me how far out of flat the chip is. Trouble is, sometimes if you start this process well away from flat, you don’t seem to be able to iterate to a flat chip very easily, the CCDInspector results don’t converge. So with this difficult camera I somehow needed to get the chip roughly flattened before using my usual method. I looked at Terry Platt’s rig on the Starlight Xpress web site but decided it was too much effort to build something like that for a job that doesn’t need to be done too often. I wanted a rig that could be assembled out of standard 2″ components. At first I had no idea how to go about this so I just stared into my drawer full of optical bits and pieces hoping for some inspiration. My eye fell upon the unused Takahashi collimator and the little light went on 🙂 In the attached image you can see the Takahashi collimator fitted to one side of the diagonal, the M26C and some extension tubes are on the other end. I used a diagonal to get a reasonable length between the CCD and the collimator and also to keep the rig more compact. The Takahashi collimator is basically a Cheshire with an eyepiece, so you illuminate it through a hole in the side with a torch and look through the eyepiece on the top. Looking through the eyepiece with the torch lighting up the rig you can see a bright white annulus, which is a reflection straight off the CCD cover glass, and “behind” this reflection you will see a central blue-green annulus surrounded by some satellite annuli – this is the reflection off the CCD itself. Now the central blue-green annulus will be off centre, so you adjust the chip flatness adjusters to move the annulus towards the centre of the eyepiece. You now rotate the whole of the CCD camera and continue to make fine adjustments to keep the blue-green annulus centred in the eyepiece for all rotation angles. When you have managed to achieve this (it actually takes a remarkable short amount of time to do this – compared to the CCDInspector method in-situ) you will have the chip pretty much flattened to the incoming optical field. All you have to do now is fit the camera back onto your scope and use the star field/CCDInspector method to get spot-on chip flatness.


