An observatory [permanent site] in your garden will completely transform your observing/imaging experience. I used to carry the Celestron Nexstar 11 GPS in and out of doors for observing, it was a nerve-wracking experience. Although I was in alt-az mode since I wasn’t imaging and setup time was very fast – I still didn’t go to all the bother of carrying all the kit out unless the conditions were perfect – and were likely to remain so all night. As I am based in the U.K. the number of such “perfect” nights was minimal.
With an observatory in your garden, you can have a pier-mounted, polar aligned, equatorial system ready to go in minutes. You don’t have the hassle of polar aligning your scope prior to every imaging session, and you can go out and start work in the breaks between clouds – something you would never do if you had to carry all the kit in and out of doors. An observatory is the biggest preventer of dust collecting on an unused scope in the corner of a room.
Construction
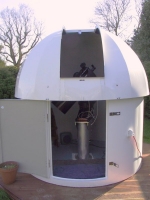
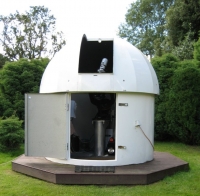
This is the dome observatory in the New Forest, Hampshire, UK. A concrete pillar foundation was first poured measuring 4 feet deep with a 2 foot by 2 foot square cross-section that seems to be amply stable for the 11 inch Nexstar GPS scope.
Next, a wooden decking was built around the pillar support. A cylindrical pillar was made by a local firm fabricated entirely in aluminium: relatively lightweight, and very stable. Being Aluminium, it doesn’t interfere with the scope’s GPS system.
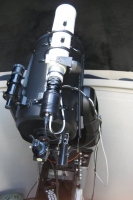
Finally, a pre-built Zenith 7 foot fibre-glass observatory was placed on the decking and bolted down. The 7 foot observatory easily houses the Nexstar 11 GPS scope with dewshield attached and two people can occupy the observatory at the same time.
Up until building the observatory I had used the Nexstar 11″ GPS on a tripod on the patio just outside the back-door of the house. This was extremely convenient for observing (just point and look) but very inconvenient for carrying the setup in and out of doors (I think I was very lucky not to have dropped the gear before moving in to the observatory!). I had two worries about moving into an observatory:
- Would the GPS work through the fibre-glass? It certainly doesn’t pick up the satellites from indoors. Answer; it works just fine.
- Would manually rotating the dome take all the fun out of observing? Answer; it’s much less of a pain than you might imagine, the excellent Zenith design means the dome moves very easily. Also, it does tend to make you look just a little longer at whatever object you pick, rather than flitting around, and I think this is a very positive outcome.
I cannot give the Zenith dome a high enough recommendation. The price is excellent, and a great deal of thought has clearly gone into the design. It only takes seconds to get the kit ready for observing and, with the terrible rain we regularly experience in the UK, I can vouch that the observatory is completely waterproof!
Comfort
I have fitted underfelt and carpet on the floor (my excuse is that it will protect dropped lenses, actual truth is that it makes it so comfortable I can stay out all night, even in the middle of winter). If you have any worries about buying and using a pre-built dome observatory, my personal experience is that it is probably the easiest and best way to go if you can afford it – and I did spend two years looking at all the possible alternatives, as well as creating many designs of my own.
Nearly forgot the minus point! When you’re using the scope on a tripod in the big outdoors, the buzz from the Celestron’s control (the bee in a can) is pretty unobtrusive. When you’re in an acoustic dome, on a quiet night, it really gets on your nerves!!!!! In January 2005 I managed to eradicate the one minus point! I upgraded the motor drives from version 30.30 to version 40.40 (download available from the Celestron site). Amongst the many benefits of the upgrade was that the telescope tracking is now entirely silent – HOORAY!
Additional Bits & Pieces
There have been a number of additions to the observatory to make life a little more pleasant, and to overcome some of the problems of living in a third world country.
We seem to have more than our fair share of power cuts in the New Forest and this has resulted in damage to both my computer and to the Celestron motor drive boards, both of which are very unpleasant experiences as you can imagine. I now use the Celestron Power Tank to power the Nexstar 11 GPS scope, basically a 12 volt rechargeable battery, and this isolates the scope entirely from the mains. For the computer I now use an uniterruptible power supply [UPS] which is again based on a rechargeable battery which in turn powers an inverter. Finally, as I am also worried about glitches down the mains as well as the power cuts, I use Belkin “power surge” extension sockets which are designed to take any damaging spikes out of the mains supply. Touch wood – so far things seem to be working o.k.
As I am located in the New Forest, you can imagine that for some months of the year, particularly from late September until late November, condensation is a major problem in the dome. I have always used “watersnakes” around the gap where the dome rotates. This is a product from Lakeland Plastics which is basically a sausage-shaped piece of fabric filled with some water absorbing substance [possibly silica-gel]. I always place these in the gap around the dome edge [on the inside of the dome] after an imaging session and they keep the ingress of water vapour right down. Unfortunately, on their own they are still not enough! I had a problem with the Hyperstar a couple of years back where halos started appearing around bright stars after about half an hour or so of imaging. At first I thought this was atmospheric water vapour. After quite a bit of investigation I found out it was actually water vapour in the Hyperstar itself – not good! I got rid of the trapped water vapour by placing the Hyperstar in an oven at 40C for about an hour, but I clearly needed to also do something about protecting the observatory. To this end I bought a dehumidifier which now runs full-time in the dome. I typically need to empty the water container every three days [roughly a gallon I suspect] throughout the year. I also have a thermostatically controlled greenhouse heater in the dome which is used to keep the dome temperature a few degrees above freezing during the winter months.
Finally, I have one of those “radio-controlled” clocks that gives me the precise time via an atomic clock [used to be at Rugby, might be somewhere else now] so that the observatory computer is always giving the correct time for the FITS data files and other astronomical programs that I might be running.
The mini-WASP Observatory:
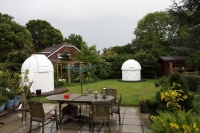
As from August 2011 a second observatory has appeared at the NFO – this is the North dome with a new 2.2m redesigned fibreglass dome from Pulsar Observatories Ltd. Lots of very nice improvements on the dome itself including wider-aperture, a much smoother dome rotation system (a little finger easily rotates the dome!), a much smoother aperture opening system with optional pulley for very easy operation from within the dome. The whole observatory is now delivered in sections allowing easy access to even the most difficult sites – all in all a great series of improvements. This new dome houses my mini-WASP imaging array – this will start off using 2 x Sky90s and 2 x M26C one-shot colour cameras for imaging. A guider telescope with guide camera and a fourth telescope for visual work are also housed in the array. The whole thing sits on a Paramount provided by SCS Astro (thank you Kieron) and Kieron also provided me with an extra Paramount counterweight when I found the mini-WASP went a little beyond my initial weight calculations.
The long business of setting up and commissioning the mini-WASP beast has begun and First Light was achieved in August 2011 with a 2,000 second exposure of the Sadr region of Cygnus. Keep visiting the NFO site to keep right up to date with developments on this unique deep-sky imaging facility.


