
Happy New Year! And the first “Deep-Sky Image of the Week” for the New Year is another belter from Rogelio!!!!! O.K. for your average Joe Public this may look pretty grey and unimpressive – where are all the pretty colours? But for us astroimagers, we know what skill (and ultra dark skies) are necessary to create a panorama such as this. In my opinion this is the most incredible amateur deep-sky image to have ever been produced – period. Under U.K. skies we struggle to pull out a little of the IFN in the M81/M82 region (I even struggled with long exposure times using the Hyperstar!) – so what do you make of this enormous ultra widefield showing the full extent of the Integrated Flux nebula around the Pole? Nothing short of outstanding. I’ll now leave it to Rogelio to discuss his incredible image and the effort it took to acquire it.
“I’ve ended up calling this the 1,200 miles image, because that’s the total number of miles I ended up driving in order to capture the data for this image. By the way, that is a record for me! We do crazy things sometimes just to capture a bunch of photons!
The Object
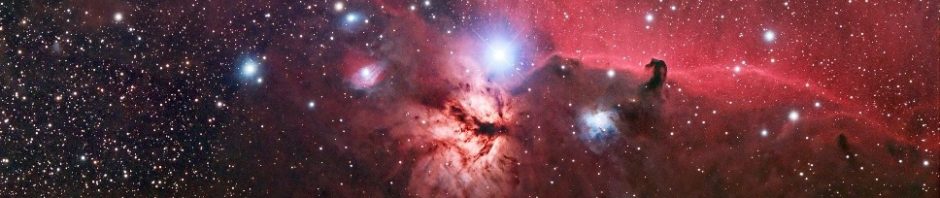
The above wide field image features a large area of the IFN (integrated flux nebula) of the polar spur – probably the largest IFN image captured by an amateur so far. The field of view is approximately 15×9 degrees. The IFN is extremely faint, so much that almost every image taken of this area would either show no IFN at all of at most, a barely perceptible hint of it.
In simple terms, the IFN is dust clouds. However, unlike most known nebulae, they do not reflect, scatter or fluoresce due to the radiation of any individual star or cluster of stars, but do so from the integrated flux of all the stars in the Milky Way Galaxy. In other words, the IFN is illuminated by the glow of our own galaxy.
Steve Mandel once said that the IFN was like photographing something through a dirty window, the IFN being the dirt on that window, except that the “dirt” itself is beautiful to behold.
The Challenge
Because the IFN is so faint, capturing it is a challenge, as even under good skies it will sit barely above the noise. This means that once you’ve captured the data and try to bring the signal from the IFN, you will bring it along with the noise in the image, making it almost impossible to discern between noise and nebulae. This is the main reason most images won’t show any or almost any IFN – as astrophotographers deal with the noise – trying to make it dissapear – the IFN will dissapear with it.
For that reason it is important to image this area from as dark skies as you can get. Otherwise, the sky glow will completely bury the signal from the IFN.
How to understand this image
From a scientific point of view, the mind establishes an order regarding what’s being seen, because the IFN is the main structure and it appears well defined, but from other perspectives, the image may look simply weird.
Also, one may feel this image has a dirty look, perhaps even artificial, not only because of us looking at the sky through a “dirty window” but also because it would be impossible to preserve a “natural” balance when attempting to reveal the extremely faint IFN structures with so little data and without blowing up the brighter structures. The purpose of this image is to reveal those structures, not to create a natural and silk-smooth “pretty” composition. Beauty in this case is in the eye of the beholder.
Capturing the data
I captured this 2×5 mosaic (10 frames) first three days in a row, on Tuesday April 6th thru Thursday the 8th, and then during one more session on April 16th, 2010, taking advantage of an unusual break in the cloudy weather we’ve been having this year so far.
The first night I traveled to Dinosaur point to take the data for three frames but I wasn’t very happy (too much skyglow), so I decided that the next two days I would travel to Lake San Antonio (about 170 miles from home) which would give me better skies (6.5 ~ 6.6 NELM approx). After all that was done, I went back to Lake San Antonio one third night on April 16th to take the last two frames.
In the end, I drove over 1120 miles during the four days to acquire the data. I believe on Friday 9th I was near a coma after the effort (ok not exactly, just BRUTALLY tired). Picture yourself leaving Lake San Antonio on Friday morning at 4am after three restless nights and already 620 miles driven, for another 160 miles drive back home, and around 6:30am as you get near your home, you run into the morning rush hour traffic… We are… a very nut crowd!
Acquisition details
Each frame of the mosaic is only 90 minutes of luminance (6×15′) and 27 minutes of RGB color (3x3x3′). I had to limit the exposure to such short times because I knew I would only have just enough clear nights this time around and even with that, I knew I could barely make it. If one thing went wrong, I wouldn’t be able to finish it. This also meant that for the most part I would stay put checking the images during the capture at least every hour or so.
Every 2+ hours I’d shift to the next frame. Besides slewing to the next area, this involved taking flat images, rotating the camera,and doing my “manual” plate solving (I don’t do plate solves, so the realigmnent – including camera rotation – is done manually, and taking test shots to make sure the camera is well positioned to cover the field for the next frame.
Processing
The small image in this page is downsampled so that it fits well in the page. The large image (the one you see when you click on the image) is downsampled from a larger version. Since the IFN is, as I mentioned earlier, just above the noise, I had to chose between leaving the image at its original size but with the obvious degradation in quality, or take advantage of the benefits of downsampling when “fighting the noise”. Even with that you can still see the image is noisy but at this point my goal wasn’t to produce a clean image as much as being able to capture all that is going on up there even if that meant producing a less than average quality image from an aesthetic point of view. As with most of my images however, the aesthetics still played a role, and that’s why care was put in preserving details, avoiding blown up stars and galaxies, etc.
A big challenge was to join the different frames of the mosaic, where none of them had similar background and signal values, each had its own gradient issues, and even at times the SNR wasn’t similar. This forced me to do some very careful but strong adjustments on each frame (using formulas suggested by PixInsight’s Juan Conejero), applying synthetic background models, etc.
How to bring out all this faint detail that sits just above the noise, without making the image look like, well, crap? While several conventional techniques were used at different stages, it was probably the multi-scale techniques the ones that helped me bringing out the fainter details while preserving the integrity of the already bright areas. No “selective stretching” was ever done in the image to bring out the significant IFN signal – that is, I did not manually select areas that I later stretched, nor created masks to increase brightness selectively. While lightness-based masks were used at different stages in the processing of the image, none was used to “push” the signal of the IFN over the background. The reason for this is actually quite simple: if I did a “selective stretching” I would be dictating where there is IFN and where there isn’t. By avoiding selective stretching, I let the data be the one defining where the IFN is and how much of it.
As for the color, obviously I didn’t have enough data to get an accurate rendition of the color in the IFN, and what I’ve got wasn’t deep at all. I knew beforehand I wouldn’t have enough time to get deep and detailed color data, so I compromised with at least getting enough color for the stars and the field, hoping that the IFN would at least inherit some color from the background signal, which is most definitely the case here, and that’s why the IFN has a brownish hue versus the more expected blueish cast – regardless, the IFN not only scatters blue light but is also fluorescing a broad red spectrum of light known as the Extended Red Emission (ERE), so the brownish hue acquired from my poor color data isn’t completely off track.”
Many, many thanks for sharing this magnificent image with us Rogelio – and for kicking off 2012 with one of the most astonishing (amateur OR professional!!) deep-sky images out there 🙂
Check out the high resolution version on Rogelio’s web site: http://blog.deepskycolors.com/archive/2010/04/08/integrated-Flux-Nebula-Ifn-really-wide.html

Beautiful work, as always, Rogelio. I remember Steve Mandel’s talk on this at the AIC….what? maybe six years ago? I was really intrigued by the new project. A mosaic this size really puts it into a great perspective.
I’ve tried a few very large mosaics and it was extremely difficult balancing the backgrounds, yet you’ve done this wonderfully here.
congrats on another very fine image.
bud